Chapter 11: Using Jython in an IDE
In this chapter, we will discuss developing Jython applications using two of the most popular integrated development environments, Eclipse and Netbeans. There are many other development environments available for Python and Jython today, however, these two are perhaps the most popular and contain the most Jython-specific tools. Eclipse has had a plugin known as PyDev for a number of years, and this plugin provides rich support for developing and maintaining Python and Jython applications alike. Netbeans began to include Python and Jython support with version 6.5 and beyond. The Netbeans IDE also provides rich support for development and maintenance of Python and Jython applications.
Please note that in this chapter we will refer to Python/Jython as Jython. All of the IDE options discussed are available for both Python and Jython unless otherwise noted. For readability and consistency sake, we’ll not refer to both Python and Jython throughout this chapter unless there is some feature that is not available for Python or Jython specifically. Also note that we will call the plugins discussed by their names, so in the case of Netbeans the plugin is called Netbeans Python Plugin. This plugin works with both Python and Jython in all cases.
Eclipse
Naturally, you will need to have Eclipse installed on your machine to use Jython with it. The latest available version when this book is being written is Eclipse 3.5 (also known as Eclipse Galileo) and it is the recommended version to use to follow this section . Versions 3.2, 3.3 and 3.4 will work too, although there will be minor user interface differences which may confuse you while following this section.
If you don’t have Eclipse installed on your machine, go to http://www.eclipse.org/downloads/ and download the version for Java developers.
Installing PyDev
Eclipse doesn’t include Jython support built-in. Thus, we will use PyDev, an excellent plugin which adds support for the Python language and includes specialized support for Jython. PyDev’s home page is http://pydev.sourceforge.net/ but you won’t need to manually download and install it.
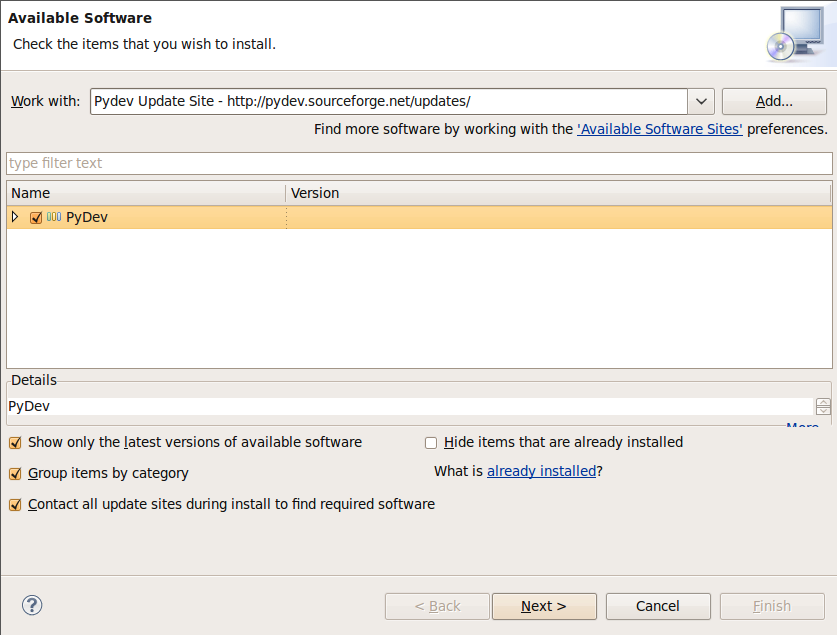
To install the plugin, start Eclipse and go to the menu , type http://pydev.sourceforge.net/updates/ into the “Work with” input box and press enter. After a short moment you will see an entry for PyDev in the bigger box below. Just select it, clicking on the checkbox which appears at the left of “PyDev” (see the image which follows, as reference) and finally click the “Next” button.
After this, just follow the wizard, accept the license agreement and then click the “Finish” button.
Once the plugin has been installed by Eclipse, you will be asked if you want to restart the IDE to enable the plugin. As that is the recommended option, do so, answering “Yes” to the dialog. Once Eclipse reboots itself, you will enjoy full Python support on the IDE.
Minimal Configuration
Before starting a PyDev project you must tell PyDev which Python interpreters are available. In this context, a interpreter is just a particular installation of some implementation of Python. When starting you will normally only need one interpreter and for this chapter we will only use Jython 2.5.0. To configure it, open the Eclipse Preferences dialog (via in the main menu bar). On the text box located at the top of the left panel, type “Jython”. This will filter the myriad of Eclipse (and PyDev!) options and will present us with a much simplified view, in which you will spot the “Interpreter - Jython” section on the left.
Once you selected the “Intepreter - Jython” section, you will be presented with
an empty list of Jython intepreters at the top of the right side. We clearly
need to fix that! So, click the “New…” button, enter “Jython 2.5.0” as the
“Interpreter Name”, click the “Browse…” button and find the jython.jar
inside your Jython 2.5.0 installation.
Note
Even if this is the only runtime we will use on this chapter, I recommend you to use a naming schema like the one proposed here, including both the implementation name (e.g.: “Jython”) and the full version (e.g.: “2.5.0”) on the interpreter name. This will avoid confusion and name clashing when adding new interpreters in the future.
After selecting the jython.jar file, PyDev will automatically detect the default,
global sys.path entries. PyDev always infer the right values, so unless
you have very special needs, just accept the default selection and click “OK”.
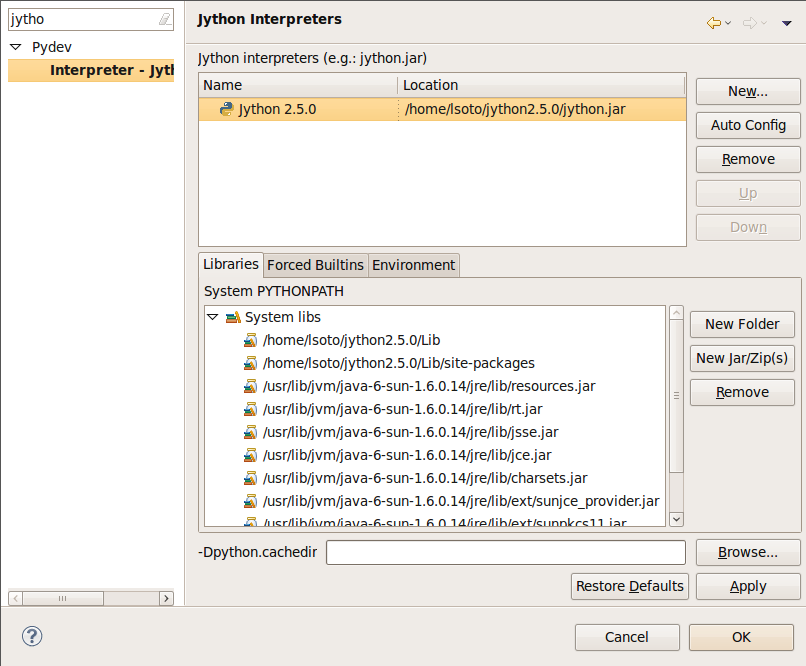
If all has gone well, you will now see an entry on the list of Jython interpreters, representing the information you just entered. It will be similar to the following picture (of course, your filesystem paths will differ):
That’s all. Click “OK” and you will be ready to develop with Jython while enjoying the support provided by a modern IDE.
If you are curious, you may want to explore the other options found on the “Preferences” window, below the “PyDev” section (after clearing the search filter we used to quickly go to the Jython interpreter configuration). But in my experience, it’s rarely needed to change most of the other options available.
In the next sections we will take a look to the more important PyDev features to have a more pleasant learning experience and make you more productive.
Hello PyDev!: Creating Projects and Executing Modules
Once you see the first piece of example code on this chapter, it may seem over simplistic. It is, indeed, a very dumb example. The point is to keep the focus on the basic steps you will perform for the lifecycle of any Python-based project inside the Eclipse IDE, and which will apply on simple and complex projects. So, as you probably guessed it, our first project will be a dumb “Hello World”. Let’s start it!
Go to . You will be presented with a potentially long list with all the kind of projects you can create with Eclipse. Select “PyDev Project”, under the “PyDev” group (you can also use the filter text box at the top and just type “PyDev Project” if it’s faster for you).
The next dialog will ask you for your project properties. As the “Project name”, we will use “LearningPyDev”. On “Project contents”, we will let checked the “Use default” checkbox, so PyDev will create a directory with the same name as the project inside the Eclipse workspace (which is the root path of your eclipse projects). Since we are using Jython 2.5.0, we will change the “Project type” to “Jython” and the “Grammar Version” to “2.5”. We will let alone the “Interpreter”, which will default to the Jython interpreter we just defined on the Minimal Configuration section. We will also left checked the “Create default ‘src’ folder and add it to the pythonpath” option since it’s a common convention on Eclipse projects.
After clicking “Finish” PyDev will create your project, which will only contain
an empty src directory and a reference to the interpreter being used. Let’s
create our program now!
Right click on the project, and select . Let the “Package” blank and enter “main” as the “Name”. PyDev offers some templates to speed up the creation of new modules, but we won’t use them, as our needs are rather humble. So let the “Template” as empty and click “Finish”.
PyDev will present you an editor for the main.py file it just created.
It’s time to implement our program. Write the following code at the editor:
if __name__ == "__main__":
    print "Hello PyDev!"
And then press Ctrl + F11 to run this program. Select “Jython Run” from the
dialog presented and click OK. The program will run and the text “Hello PyDev!”
will appear on the console, located on the bottom area of the IDE.
If you manually typed the program, you probably noted that the IDE knows that in Python a line ending in “:” marks the start of a block and will automatically put your cursor at the appropriate level of indentation in the next line. See what happens if you manually override this decision and put the print statement at the same indentation level of the if statement and save the file. The IDE will highlight the line flagging the error. If you hover at the error mark, you will see the explanation of the error, as seen in the image:
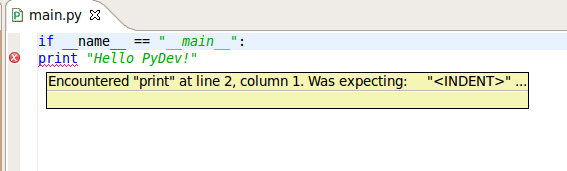
Expect the same kind of feedback for whatever syntax error you made. It helps to avoid the frustration of going on edit-run loops only to find further minor syntax errors.
Passing Command-line Arguments and Customizing Execution
Command line arguments may seem old-fashioned, but are actually a very simple and effective way to let programs interact with the outside. Since you have learned to use Jython as a scripting language, it won’t be uncommon to write scripts which will take its input from the command line (note that for unattended execution, reading input from the command line is way more convenient that obtaining data from the standard input, let alone using a GUI).
As you have probably guessed, we will make our toy program to take a command line argument. The argument will represent the name of the user to greet, to build a more personalized solution. Here is how our main.py should look like:
import sys
if __name__ == "__main__":
    if len(sys.argv) < 2:
        print "Sorry, I can't greet you if you don't say your name"
    else:
        print "Hello %s!" % sys.argv[1]
If you hit Ctrl + F11 again, you will see the “Sorry I can’t greet you…”
message on the console. It makes sense, since you didn’t pass the name. Not to
say that it was your fault, as you didn’t have any chance to say your name
either.
To specify command line arguments, go to the menu, and you will find an entry named “LearningPyDev main.py” under the “Jython Run” section in the left. It will probably be already selected, but if it’s not, select it manually. Then, on the main section of the dialog you will find ways to customize the execution of our script. You can change aspects like the current directory, pass special argument to the JVM, change the interpreter to use, set environment variables, among others. We just need to specify an argument so let’s type “Bob” on the “Program arguments” box and click the “Run” button.
As you’d expect, the program now prints “Hello Bob!” on the console. Note that
the value you entered is remembered, that is, if you press Ctrl + F11 now,
the program will print “Hello Bob!” again. Some people may point out that this
behavior makes testing this kind of programs very awkward, since the “Run
Configurations” dialog will have to be opened each time the arguments need to be
changed. But if we really want to test our programs (which is a good idea), we
should do it in the right way. We will look into that soon, but first lets
finish our tour on basic IDE features.
Playing with the Editor
Let’s extend our example code a bit more. providing different ways to greet our
users, in different languages. We will use the optparse to process the
arguments this time. Refer to Chapter 8 if you want to remember how to use
optparse. We will also use decorators (seen in Chapter 6) to make it trivial
to extend our program with new ways to greet our users. So, our little
main.py has grown a bit now:
# -*- coding: utf-8 -*-
import sys
from optparse import OptionParser

greetings = dict(en=u'Hello %s!',
                 es=u'Hola %s!',
                 fr=u'Bonjour %s!',
                 pt=u'Alò %s!')

uis = {}
def register_ui(ui_name):
    def decorator(f):
        uis[ui_name] = f
        return f
    return decorator

def message(ui, msg):
    if ui in uis:
        uis[ui](msg)
    else:
        raise ValueError("No greeter named %s" % ui)

def list_uis():
    return uis.keys()

@register_ui('console')
def print_message(msg):
    print msg

@register_ui('window')
def show_message_as_window(msg):
    from javax.swing import JFrame, JLabel
    frame = JFrame(msg,
                   defaultCloseOperation=JFrame.EXIT_ON_CLOSE,
                   size=(100, 100),
                   visible=True)
    frame.contentPane.add(JLabel(msg))

if __name__ == "__main__":
    parser = OptionParser()
    parser.add_option('--ui', dest='ui', default='console',
                      help="Sets the UI to use to greet the user. One of: %s" %
                      ", ".join("'%s'" % ui for ui in list_uis()))
    parser.add_option('--lang', dest='lang', default='en',
                      help="Sets the language to use")
    options, args = parser.parse_args(sys.argv)
    if len(args) < 2:
        print "Sorry, I can't greet you if you don't say your name"
        sys.exit(1)

    if options.lang not in greetings:
        print "Sorry, I don't speak '%s'" % options.lang
        sys.exit(1)

    msg = greetings[options.lang] % args[1]

    try:
        message(options.ui, msg)
    except ValueError, e:
        print "Invalid UI name\n"
        print "Valid UIs:\n\n" + "\n".join(' * ' + ui for ui in list_uis())
        sys.exit(1)
Take a little time to play with this code in the editor. Try pressing Ctrl +
Space, which is the shortcut for automatic code completion (also known as
“Intellisense” on Microsoft’s parlance) on different locations. It will provide
completion for import statements (try completing that line just after the
import token, or in the middle of the OptionParser token) and attribute
or method access (like on sys.exit or parser.add_option or even in
JFrame.EXIT_ON_CLOSE which is accessing a Java class! ). It also provides
hints about the parameters in the case of methods.
In general, every time you type a dot, the automatic completion list will pop
out, if the IDE knows enough about the symbol you just typed to provide
help. But you can also call for help at any given point. For example, go to the
bottom of the code and type message(. Suppose you just forgot the order of
the parameters to that function. Solution: Press Ctrl + Space and PyDev will
“complete” the statement, using the name of the formal parameters of the
function.
Also try Ctrl + Space on keywords like def. PyDev will provide you
little templates which may save you some typing. You can customize the templates
on the section of the Eclipse
Preferences window (available on the
main menu).
The other thing you may have noted now that we have a more sizable program with some imports, functions and global variables is the “Outline” panel in the right side of the IDE window shows a tree-structure view of code being edited showing such features. It also displays classes, by the way.
And don’t forget to run the code! Of course, it’s not much spectacular to see
that after pressing Ctrl + F11 we still get the same boring “Hello Bob!”
text on the console. But if you edit the command line argument (as seen
recently, via the “Run Configurations…” dialog) to the following: Bob --lang
es --ui window, you will get a nice window greeting Bob in Spanish. Also see
what happens if you specify a non supported UI (say, --ui speech) or a
unsupported language. We even support the --help! So we have a generic,
polyglot greeter which also happens to be reasonably robust and user friendly
(for command line program standards, that is).
At this point you are probably tired of manually testing the program editing the command line argument on that dialog. Just one more extra section and we will get into a better way to test our program using the IDE. Actually, part of the next section will help us towards the solution.
Testing
OK, it’s about time to explore our options to test our code, without resorting to the cumbersome manual black box testing we have been done changing the command line argument and observing the output.
PyDev supports running PyUnit tests from the IDE, so we will write them. Let’s
create a module named tests on the hello package with the following
code:
import unittest
import hello

class UIMock(object):
    def __init__(self):
        self.msgs = []
    def __call__(self, msg):
        self.msgs.append(msg)

class TestUIs(unittest.TestCase):
    def setUp(self):
        global hello
        hello = reload(hello)
        self.foo = UIMock()
        self.bar = UIMock()
        hello.register_ui('foo')(self.foo)
        hello.register_ui('bar')(self.bar)
        hello.message('foo', "message using the foo UI")
        hello.message('foo', "another message using foo")
        hello.message('bar', "message using the bar UI")

    def testBarMessages(self):
        self.assertEqual(["message using the bar UI"], self.bar.msgs)

    def testFooMessages(self):
        self.assertEqual(["message using the foo UI",
                          "another message using foo"],
                          self.foo.msgs)
    def testNonExistentUI(self):
        self.assertRaises(hello.UINotSupportedExeption,
                          hello.message, 'non-existent-ui', 'msg')

    def testListUIs(self):
        uis = hello.list_uis()
        self.assertEqual(2, len(uis))
        self.assert_('foo' in uis)
        self.assert_('bar' in uis)
As you can see, the test covers the functionality of the dispatching of messages
to different UIs. A nice feature of PyDev is the automatic discovery of tests,
so you don’t need to code anything else to run the tests above. Just right click
on the src folder on the Package Explorer and select . You will see the output of the test almost immediately on
the console:
Finding files...
['/home/lsoto/eclipse3.5/workspace-jythonbook/LearningPyDev/src/'] ... done
Importing test modules ... done.

testBarMessages (hello.tests.TestUIs) ... ok
testFooMessages (hello.tests.TestUIs) ... ok
testListUIs (hello.tests.TestUIs) ... ok
testNonExistentUI (hello.tests.TestUIs) ... ok

----------------------------------------------------------------------
Ran 4 tests in 0.064s

OK
Python’s unittest is not the only testing option on the Python world. A convenient way to do tests which are more black-box-like than unit test, though equally automated is doctest.
Note
We will cover testing tools in much greater detail in Chapter 19, so take a look at that chapter if you feel too disoriented.
The nice thing about doctests is that they look like a interactive session with the interpreter, which makes them quite legible and easy to create. We will test our console module using a doctest.
First, click the rightmost button on the console’s toolbar (you will recognize it as the one with a plus sign on its upper left corner, which has the “Open Console” tip when you pass the mouse over it). From the menu, select “PyDev Console”. To the next dialog answer “Jython Console”. After doing this you will get an interactive interpreter embedded on the IDE.
Let’s start exploring our own code using the interpreter:
>>> from hello import console
>>> console.print_message("testing")
testing
I highly encourage you to type those two commands yourself. You will note how code completion also works on the interactive interpreter!
Back to the topic, we just interactively checked that our console module works as expected. The cool thing is that we can copy and paste this very snippet as a doctest which will serve to automatically check that the behavior we just tested will stay the same in the future.
Create a module named doctests inside the hello package, and paste those
three lines from the interactive console, surrounding them by triple quotes
(since they are not syntactically correct python code after all). After adding a
little of boilerplate to make this file executable, it will look like this:
"""
>>> from hello import console
>>> console.print_message("testing")
testing
"""

if __name__ == "__main__":
    import doctest
    doctest.testmod(verbose=True)
After doing this, you can run this test via the menu while doctests.py is the currently active file on the editor. If
all goes well, you will get the following output:
Trying:
    from hello import console
Expecting nothing
ok
Trying:
    console.print_message("testing")
Expecting:
    testing
ok
1 items passed all tests:
   2 tests in __main__
2 tests in 1 items.
2 passed and 0 failed.
Test passed.
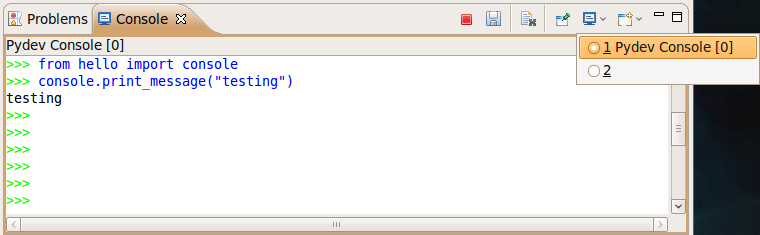
After running the doctest you will notice that your interactive console has gone away, replaced by the output console showing the test results. To go back to the interactive console, look for the console button in the console tab toolbar, exactly at the left of the button you used to spawn the console, Then, on the dropdown menu select the “PyDev Console” as shown in the next image.
As you can see, you can use the interactive console to play with your code, try ideas and test them. And later a simple test can be made just by copying and pasting text from the same interactive console session. Of special interest is the fact that, since Jython code can access Java APIs quite easily, you can also test classes written with Java in this way!
Adding Java libraries to the project
Finally, I will show you how to integrate Java libraries into your project. When testing the command line switches some pages ago, I hinted that we could have an “speech” interface for our greeter. It doesn’t sound like a bad idea after all, since (like on almost any aspect) the Java world has good libraries to solve that problem.
We will use the FreeTTS library, which can be downloaded from http://freetts.sourceforge.net/docs/index.php. (You should download the binary version)
After downloading FreeTTS you will have to extract the archive on some place on your hard disk. Then, we will import a JAR file from FreeTTS into our PyDev project.
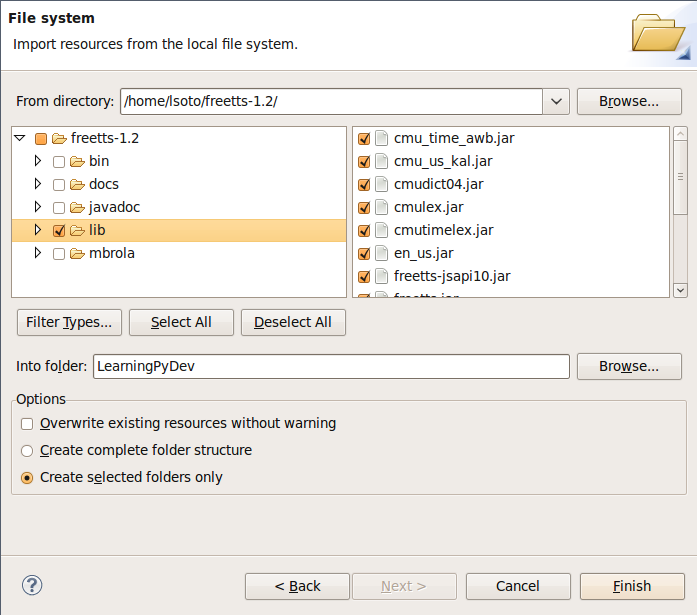
Right click the project and select “Import…”. Then choose
and browse to the directory in which
you expanded FreeTTS and select it. Finally, expand the directory on the left
side panel and check the lib subdirectory. See the following image as
reference.
After clicking finish you will see that the file is now part of your project.
Tip
Alternatively, and depending on your operating system, the same operation can be performed copying the folder from the file manager and pasting it into the project (either via menu, keyboard shortcuts or drag & drop).
Now, the file is part of the project, but we need to tell PyDev that the file is
a JAR file and should be added to the sys.path of our project
environment. To do this right click on the project and select “Properties”. Then
on the left panel of the dialog select “PyDev - PYTHONPATH”. Then click the “Add
zip/jar/egg” button and select the lib/freetts.jar file on the right side of the
dialog that will pop out. Click OK on both dialogs and you are ready to use this
library from Python code.
The code for our new hello.speech module is as follows:
from com.sun.speech.freetts import VoiceManager
from hello import register_ui

@register_ui('speech')
def speech_message(msg):
    voice = VoiceManager().getVoice("kevin16")
    voice.allocate()
    voice.speak(msg)
    voice.deallocate()
If you play with the code on the editor you will notice that PyDev also provides completion for imports statement referencing the Java library we are using.
Finally, we will change the second line of main.py from:
import hello, hello.console, hello.window
to:
import hello, hello.console, hello.window, hello.speech
In order to load the speech UI too. Feel free to power on the speakers and use
the --ui speech option to let the computer greet yourself and your friends!
There you go, our humble greeter has finally evolved into a quite interesting, portable program with speech synthesis abilities. It’s still a toy, but one which shows how quick you can move with the power of Jython, the diversity of Java and the help of an IDE.
Other topics
I have covered most of the PyDev features, but I’ve left a few unexplored. We will take a look at what we’ve missed before ending this half-chapter dedicated to PyDev.
Debugging
PyDev offers full debugging abilities for your Jython code. To try it just put
some breakpoints on your code double clicking on the left margin of the
editor, and then start your program using the F11 shortcut instead of
Ctrl + F11.
Once the debugger hits your breakpoint, the IDE will ask you to change its perspective. It means that it will change to a different layout, better suited for debugging activities. Answer yes to such dialog and you will find yourself on the debugging perspective which looks like the following image:
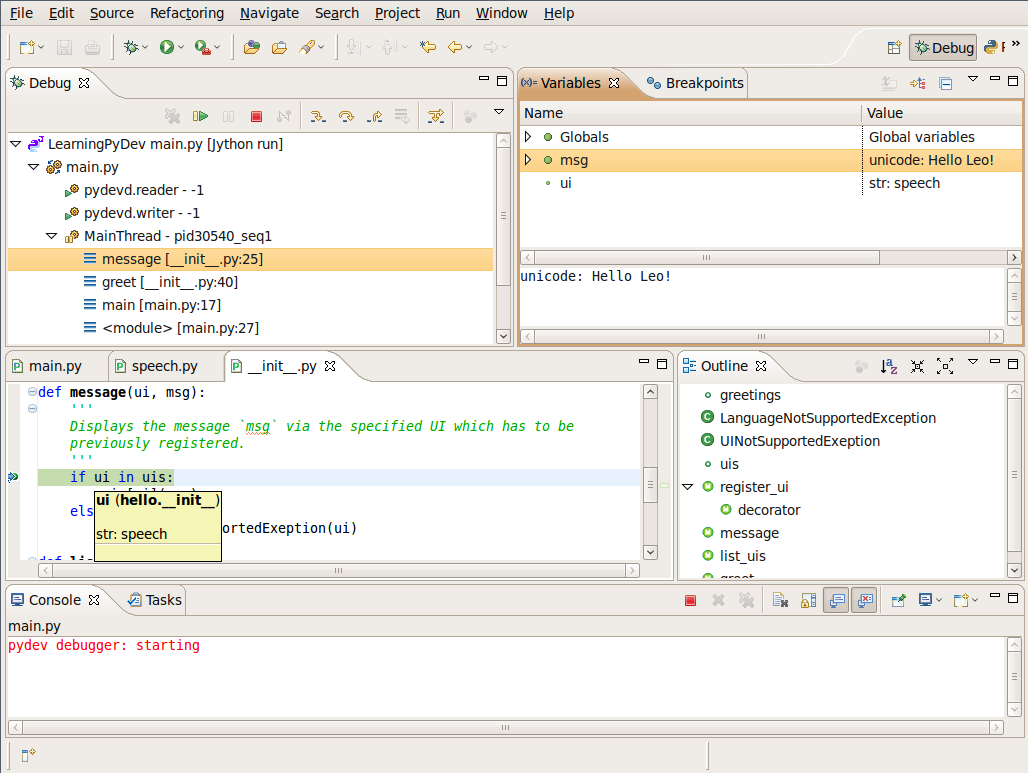
In few words, the perspective offers the typical elements of a debugger: the
call stack, the variables for each frame of the call stack, a list of
breakpoints, and the ability to “Step Into” (F5), “Step Over” (F6) and
“Resume Execution” (F8) among others.
Once you finish your debugging session, you can go back to the normal editing perspective by selecting “PyDev” on the upper right area of the main IDE Window (which will have the “Debug” button pushed while staying in the debugging perspective).
Refactoring
PyDev also offers some basic refactoring abilities. Some of them are limited to CPython, but others, like “Extract Method” work just fine with Jython projects. I encourage you to try them to see if they fit your way of work. Sometimes you may prefer to refactor manually since the task tend do not be as painful as in Java (or any other statically typed language without type inference). On the other hand, when the IDE can do the right thing for you and avoid some mechanical work, you will be more productive.
(Half-)Conclusion
PyDev is a very mature plugin for the Eclipse platform which can be an important element in your toolbox. Automatic completion ans suggestions helps a lot when learning new APIs (both Python APIs and Java APIs!) specially if paired with the interactive console. It is also a good way to introduce a whole team into Jython or into an specific Jython project, since the project-level configuration can be shared via normal source control system. Not to mention that programmers coming from the Java world will find themselves much more comfortable on a familiar environment.
To me, IDEs are a useful part of my toolbox, and tend to shine on big codebases and/or complex code which I don’t completely understand yet. Powerful navigation and refactoring abilities are key on the process of understanding such kind of projects and are features that should only improve in the future.
Finally, the debugging capabilities of PyDev are superb and will end your days
of using print as a poor man’s debugger (Seriously, I did that for a
while!). Even more advanced Python users who master the art of import pdb;
pdb.set_trace() should give it a try.
Now, this is a “half-conclusion” because PyDev isn’t the only IDE available for Jython. If you are already using the Netbeans IDE or didn’t like Eclipse or PyDev for some reason, take a look at the rest of this chapter in which we will cover the Netbeans plugin for Python development.
Netbeans
The Netbeans integrated development environment has been serving the Java community well for over ten years now. During that time, the tool has matured quite a bit from what began as an ordinary Java development tool into what is today an advanced development and testing environment for Java and other languages alike. As Java and JavaEE application development still remain an integral part of the tool, other languages such as JRuby, Jython, Groovy, and Scala have earned themselves a niche in the tool as well. Most of these languages are supported as plugins to the core development environment, which is what makes Netbeans such an easy IDE to extend as it is very easy to build additional features to distribute. The Python support within Netbeans began as a small plugin known as nbPython, but it has grown into a fully-featured Python development environment and it continues to grow.
The Netbeans Python support provides developers with all of the expected IDE features such as code completion, color coding, and easy runtime development. It also includes some nice advanced features for debugging applications and the like.
IDE Installation and Configuration
The first step for installing the Netbeans Python development environment is to download the current release of the Netbeans IDE. At the time of this writing, Netbeans 6.7 was the most recent release, hot off the presses in fact. You can find the IDE download by going to the website http://www.netbeans.org and clicking on the download link. Once you do so, you’ll be presented with plenty of different download options. These are variations of the IDE that are focused on providing different features for developers depending upon what they will use the most. Nobody wants a bulky, memory hungry development tool that will overhaul a computer to the extreme. By providing several different configuration of the IDE, Netbeans gives you the option to leave off the extras and only install those pieces that are essential to your development. The different flavors for the IDE include Java SE, Java, Ruby, C/C++, PHP, and All. For those developers only interested in developing core Java applications, the Java SE download would suffice. Likewise, someone interested in any of the other languages could download the IDE configuration specific to that language. For the purposes of this book and in my everyday development, I use the “All” option as I enjoy having all of the options available. However, there are options available for adding features if you download only the Java SE or another low-profile build and wish to add more later.
At the time of this writing, there was also a link near the top of the downloads page for PythonEA distribution. If that link or a similar Python Netbeans distribution link is available then you can use it to download and install just the Jython-specific features of the Netbeans IDE. I definitely do not recommend taking this approach unless you plan to purely code Jython applications alone. It seems to me that a large population of the Jython developer community also codes some Java, and may even integrate Java and Jython within their applications. If this is the case, you will want to have the Java-specific features of Netbeans available as well. That is why I do not recommend the Python-only distribution for Jython developers, but the choice is there for you to make.
Now that you’ve obtained the IDE, it is easy to install in any environment using the intuitive Netbeans installer. Perhaps the most daunting task when using a new IDE is configuring it for your needs. This should not be the case with Netbeans though because the configuration for Java and Python alike are quite simple. For instance, if you working with the fully-featured installation, you will already have application servers available for use as Netbeans installs Glassfish by default. Note that it is a smart idea to change that admin password very soon after installation in order to avoid any potentially embarrassing security issues.
When the IDE initially opens up, you are presented with a main window that includes links to blogs and articles pertaining to Netbeans features. You also have the standard menu items available such as File, Edit, Tools, and so on. In this chapter we will specifically cover the configuration and use of the Jython features, however, there are very useful tutorials available online and in book format for covering other Netbeans features. One thing you should note at this point is that with the initial installation, Python/Jython development tools are not yet installed unless you chose to install the PythonEA distribution. Assuming that you have installed the full Netbeans distribution, you will need to add the Python plugin via the Netbeans plugin center. You will need to go to the Tools menu and then open the Plugins *submenu. From there, you should choose the *Available Plugins tab and sort by category. Select all of the plugins in the Python category and then install. This option will install the Python plugin as well as a distribution of Jython. You will need to follow on-screen directions to complete the installation.
Once the plugin has been successfully installed then it is time to configure your Python and Jython homes. To do so, go to the Tools menu and then open the Python Platforms menu as this will open the platform manager for Python/Jython. At the time of this writing, the default Jython version that was installed with the Python plugin was 2.5b0+, even though 2.5.0 final has been release. As this is the case, go ahead and add your Jython 2.5.0 final installation as a platform option and make it the default.
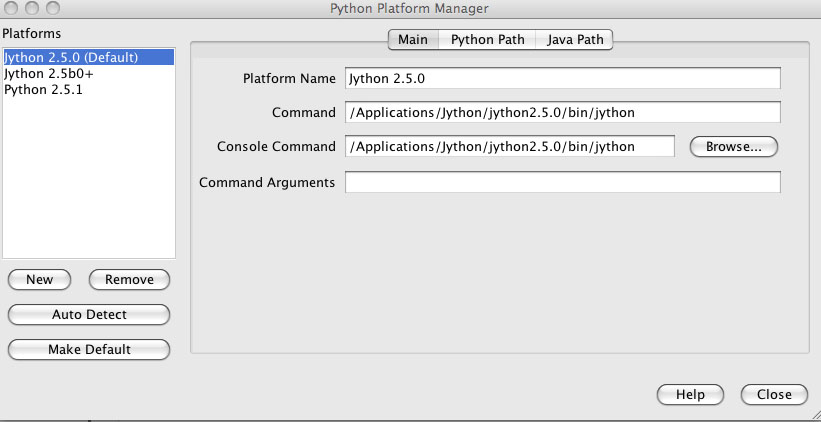
To do so, click on the New button underneath the platform listing. You can try to select the Auto Detect option, but I did not have luck with Netbeans finding my Jython installation for 2.5.0 final using it. If you choose the New button then you will be presented with a file chooser window. You should choose the Jython executable that resides in the area <JYTHON_HOME>/bin and all of the other necessary fields will auto-populate with the correct values. Once completed, choose the Close button near the bottom of the Python Platform Manager window. You are now ready to start programming with Python and Jython in Netbeans.
Advanced Python Options
If you enter the Netbeans preferences window then you will find some more advanced options for customizing your Python plugin. If you go to the Editor tab, you can set up Python specific options for formatting, code templates, and hints. In doing so, you can completely customize the way that Netbeans displays code and offers assistance when working with Jython. You can also choose to set up different fonts and coloring for Python code by selecting the Fonts and Colors tab. This is one example of just how customizable Netbeans really is because you can set up different fonts and colors for each language type.
If you choose the Miscellaneous tab then you can add different file types to the Netbeans IDE and associate them with different IDE features. If you look through the pull-down menu of files, you can see that files with the extension of py or pyc are associated as Python files. This ensures that files with the associated extensions will make use of their designated Netbeans features. For instance, if we wanted to designate our Jython files with the extension of jy, we could easily do so and associate this extension with Python files in Netbeans. Once we’ve made this association then we can create files with an extension of jy and use them within Netbeans just as if they were Python files. Lastly, you can alter a few basic options such as enabling prompting for python program arguments, and changing debugger port and shell colors from the Python tab in Netbeans preferences.
General Jython Usage
As stated previously in the chapter, there are a number of options when using the Netbeans Python solution. There are a few different selections that can be made when creating a new Jython project. You can either choose to create a Python Project or Python Project with Existing Sources. These two project types are named quite appropriately as a Python Project will create an empty project, and
Once created it is easy to develop and maintain applications and scripts alike. Moreover, you can debug your application and have Netbeans create tests if you choose to do so. One of the first nice features you will notice is the syntax coloring in the editor. There is also testing available via the debugging
Stand Alone Jython Apps
In this section, I will discuss how to develop a stand-alone Jython application within Netbeans. We will use a variation of the standard HockeyRoster application that I have used in other places throughtout the book. Overall, the development of a stand alone Jython application in Netbeans differs very little from a stand alone Java application. The main difference is that you will have different project properties and other options available that pertain to creating Jython. And obviously you will be developing in Jython source files along with all of the color coding and code completion that the Python plugin has to offer.
To get started, go ahead and create a new Python Project by using the File menu or the shortcut in the Netbeans toolbar. For the purposes of this section, name the new project HockeyRoster. Uncheck the option to Create Main File as we will do this manually. Once your project has been created, explore some of the options you have available by right-clicking (ctrl-click) on the project name. The resulting menu should allow you the option to create new files, run, debug, or test your application, build eggs, work with code coverage, and more. At this point you can also change the view of your Python packages within Netbeans by choosing the View Python Packages as option. This will allow you the option to either see the application in list or tree mode, your preference. You can search through your code using the Find option, share it on Kenai with the integrated Netbeans Kenai support, look at the local file history, or use your code with a version control system. Click on the Properties option and the Project Properties window should appear. From within the Project Properties window, there are options listed on the left-hand side including Source, Python, Run, and Formatting. The Source option provides the ability to change source location or add new source locations to your project. The Test Root Folders section within this option allows you to add a location where Python tests reside so that you can use them with your project. The Python option allows you to change your Python platform and add locations, JARs, and files to your Python path. Changing your Python platform provides a handy ability to test your program on Jython and Python alike, if you want to ensure that your code works on each platform. The Run option provides the ability to add or change the Main module, and add application arguments. Lastly, the Formatting option allows you to specify different formatting options in Netbeans for this particular project. This is great because each different project can have different colored text, etc. depending upon the options chosen.
At this point, create the Main module for the HockeyRoster application by using the File and then New drop-down menu, right-clicking (cntrl-click) on the project, or using the toolbar icon. From here you can either create an Executable Module, Module, Empty Module, Python Package, or Unit Test. Chooose to create an Executable Module and name the main file HockeyRoster.py, and keep in mind that when we created the project we had the ability to have the IDE generate this file for us but we chose to decline. Personally, I like to organize my projects using the Python packaging system. Create a some packages now using the same process that you used to create a file and name the package org. Add another package within the first and name it jythonbook. Once created, drag your HockeyRoster.py module into the jythonbook package to move it into place. Note that you can also create several packages at the same time by naming a package like org.jythonbook, which will create both of the resulting packages.
The HockeyRoster.py main module will be the implementation module for our application, but we still need somewhere to store each of the player’s information. For this, we will create class object container named Player.py. Go ahead and create an “Empty Module” named Player within the same jythonbook package. Now we will code the Player class for our project. To do so, erase the code that was auto-generated by Netbeans in the Player.py module and type the following. Note that you can change the default code that is created when generating a new file by changing the template for Python applications.
# Player.py
#
# Class container to hold player information


class Player:

    # Player attributes

    id = 0
    first = None
    last = None
    position = None
    goals = 0
    assists = 0


    def create(self, id, first, last, position):
        self.id = id
        self.first = first
        self.last = last
        self.position = position

    def set_goals(self, goals):
        self.goals = goals

    def add_goal(self):
        self.goals = goals + 1

    def get_goals(self):
        return self.goals

    def set_assists(self, assists):
        self.assists = assists

    def add_assist(self):
        self.assists = assists + 1

    def get_assists(self):
        return self.assists
The first thing to note is that Netbeans will maintain your indentation level. It is also easy to tab backwards by using the SHIFT + TAB keyboard shortcut. Using the default environment settings, the keywords should be in a different color (blue by default) than the other code. Method names will be in bold, and references to self or variables will be in a different color as well. You should notice some code completion, mainly the automatic self placement after you type a method name and then the right parentheses. Other subtle code completion features also help to make our development lives easier. If you make an error, indentation or otherwise, you will see a red underline near the error as well as a red error badge on the line number within the left-hand side of the editor. Netbeans will offer you some assistance in determining the cause of the error if you hover your mouse over the red error badge or underline.
Now that we have coded the first class in our stand-alone Jython application, it is time to take a look at the implementation code. The HockeyRoster.py module is the heart of our roster application as it controls what is done with the team. We will use the shelve technique to store our Player objects to disk for the roster application. As you can see from the code below, this is a very basic application and is much the same as the implementation that will be found in the next chapter using Hibernate persistence.
# HockeyRoster.py
#
# Implemenatation logic for the HockeyRoster application

# Import Player class from the Player module

from Player import Player
import shelve
import sys

# Define a list to hold each of te Player objects
playerList = []
factory = None

# Define shelve for storage to disk
playerData = None

# makeSelection()
#
# Creates a selector for our application.  The function prints output to the
# command line.  It then takes a parameter as keyboard input at the command line
# in order to choose our application option.

def makeSelection():
    validOptions = ['1','2','3','4','5']
    print "Please chose an option\n"

    selection = raw_input("Press 1 to add a player, 2 to print the roster, 3 to search for a player on the team, 4 to remove player, 5 to quit: ")
    if selection not in validOptions:
        print "Not a valid option, please try again\n"
        makeSelection()
    else:
        if selection == '1':
            addPlayer()
        elif selection == '2':
            printRoster()
        elif selection == '3':
            searchRoster()
        elif selection == '4':
            removePlayer()
        else:
            print "Thanks for using the HockeyRoster application."

# addPlayer()
#
# Accepts keyboard input to add a player object to the roster list.  This function
# creates a new player object each time it is invoked and appends it to the list.
def addPlayer():
    addNew = 'Y'
    print "Add a player to the roster by providing the following information\n"
    while addNew.upper() == 'Y':
        first = raw_input("First Name: ")
        last = raw_input("Last Name: ")
        position = raw_input("Position: ")

        id = returnPlayerCount() + 1
        print id
        #set player and shelve
        player = Player(id, first, last, position)
        playerData[str(id)] = player


        print "Player successfully added to the roster\n"
        addNew = raw_input("Add another? (Y or N)")
    makeSelection()

# printRoster()
#
# Prints the contents of the list to the command line as a report
def printRoster():
    print "====================\n"
    print "Complete Team Roster\n"
    print "======================\n\n"
    playerList = returnPlayerList()
    for player in playerList.keys():
        print "%s %s - %s" % (playerList[player].first, playerList[player].last, playerList[player].position)
    print "\n"
    print "=== End of Roster ===\n"
    makeSelection()

# searchRoster()
#
# Takes input from the command line for a player's name to search within the
# roster list.  If the player is found in the list then an affirmative message
# is printed.  If not found, then a negative message is printed.
def searchRoster():
    index = 0
    found = False
    print "Enter a player name below to search the team\n"
    first = raw_input("First Name: ")
    last = raw_input("Last Name: ")
    position = None
    playerList = returnPlayerList()
    for playerKey in playerList.keys():
        player = playerList[playerKey]
        if player.first.upper() == first.upper() and player.last.upper() == last.upper():
            found = True
            position = player.position
    if found:
        print '%s %s is in the roster as %s' % (first, last, position)
    else:
        print '%s %s is not in the roster.' % (first, last)
    makeSelection()

def removePlayer():
    index = 0
    found = False
    print "Enter a player name below to remove them from the team roster\n"
    first = raw_input("First Name: ")
    last = raw_input("Last Name: ")
    position = None
    playerList = returnPlayerList()
    for playerKey in playerList.keys():
        player = playerList[playerKey]
        if player.first.upper() == first.upper() and player.last.upper() == last.upper():
            found = True
            foundPlayer = player
    if found:
        print '%s %s is in the roster as %s, are you sure you wish to remove?' % (foundPlayer.first, foundPlayer.last, foundPlayer.position)
        yesno = raw_input("Y or N")
        if yesno.upper() == 'Y':
                # remove player from shelve
                print 'The player has been removed from the roster', foundPlayer.id
                del(playerData[str(foundPlayer.id)])
        else:
            print 'The player will not be removed'
    else:
        print '%s %s is not in the roster.' % (first, last)
    makeSelection()

def returnPlayerList():
    playerList = playerData
    return playerList

def returnPlayerCount():
    return len(playerData.keys())


# main
#
# This is the application entry point.  It simply prints the applicaion title
# to the command line and then invokes the makeSelection() function.
if __name__ == "__main__":
    print sys.path
    print "Hockey Roster Application\n\n"
    playerData = shelve.open("players")
    makeSelection()
The code should be relatively easy to follow at this point in the book. The main function initiates the process as expected, and as you see it either creates or obtains a reference to the shelve or dictionary where the roster is stored. Once this occurs then the processing is forwarded to the makeSelection() function that drives the program. The important thing to note here is that when using Netbeans the code is layed out nicely, and that code completion will assist with imports and completion of various code blocks. To run your program, you can either right-click (CTRL+CLICK) on the project or set the project as the main project within Netbeans and use the toolbar or pull-down menus. If everything has been set up correctly then you should see the program output displaying in the Netbeans output window. You can interact with the output window just as you would with the terminal.
Jython and Java Integrated Apps
Rather than repeat the different ways in which Jython and Java can be intermixed within an application, this section will focus on how to do so from within the Netbeans IDE. There are various approaches that can be taken in order to perform integration, so this section will not cover all of them. However, the goal is to provide you with some guidelines and examples to use when developing integrated Jython and Java applications within Netbeans.
Using a JAR or Java Project in Your Jython App
Making use of Java from within a Jython application is all about importing and ensuring that you have the necessary Java class files and/or JAR files in your classpath. In order to achieve this technique successfully, you can easily ensure that all of the necessary files will be recognized by the Netbeans project. Therefore, the focus of this section is on using the Python project properties to set up the sys.path for your project. To follow along, go ahead and use your HockeyRoster Jython project that was created earlier in this section.
Let’s say that we wish to add some features to the project that are implemented in a Java project named HockeyIntegration that we are coding in Netbeans. Furthermore, let’s assume that the HockeyIntegration Java project compiles into a JAR file. In order to use this project from within our HockeyRoster project, you’ll need to open up the project properties by right-clicking on your Jython project and choosing the Properties option. Once the window is open then click on the Python menu item on the left-hand side of the window. This will give you access to the sys.path so you can add other Python modules, eggs, Java classes, JAR files, etc. Click on the Add button and then traverse to the project directory for the Java application you are developing. Once there, go within the dist directory and select the resulting JAR file and click OK. You can now use any of the Java project’s features from within your Jython application.
If you are interested in utilizing a Java API that exists within the standard Java library then you are in great shape. As you should know by now, Jython automatically provides access to the entire Java standard library. You merely import the Java that you wish to use within your Jython applicaton and begin using, nothing special to set up within Netbeans. At the time of this writing, the Netbeans Python EA did not support import completion for the standard Java library. However, I suspect that this feature will be added in a subsequent release.
Using Jython in Java
If you are interested in using Jython or Python modules from within your Java applications, Netbeans makes it easy to do. As mentioned in Chapter 10, the most common method of utilizing Jython from Java is to use the object factory pattern. However, there are other ways to do this such as using the clamp project which is not yet production ready at the time of this writing. For the purposes of this section, we’ll discuss how to utilize another Netbeans Jython project as well as other Jython modules from within your Java applicaton using the object factory pattern.
In order to effectively demonstrate the use of the object factory pattern from within Netbeans, we’ll be making use of the PlyJy project which provides object factory implementations that can be used out-of-the-box. If you haven’t done so already, go to the Project Kenai site find the PlyJy project and download the provided JAR. We will use the Netbeans project properties window in our Java project to add this JAR file to our project. Doing so will effectively diminish the requirement of coding any object factory implementations by hand and we’ll be able to directly utilize Jython classes in our project.
Create a Java project named ObjectFactoryExample by using the “New->Project->Java Application” selection. Once you’ve done so, right-click (CNTRL+CLICK) on the project and choose Properties. Once the project properties window appears, click on the Libraries option on the left-hand side. From there, add the PlyJy JAR file that you previously downloaded to your project classpath. You will also have to add the jython.jar file for the appropriate version of Jython that you wish to use. In our case, we will utilize the Jython 2.5.0 release.
The next step is to ensure that any and all Jython modules that you wish to use are in your CLASSPATH somewhere. This can be easily done by either adding them into your application as regular code modules somewhere and then going into the project properties window and including that directory in “Compile-Time Libraries” list contained the Libraries section by using the “Add JAR/Folder” button. Although this step may seem unncessary because the modules are already part of your project, it must be done in order to place them into your CLASSPATH. Once they’ve been added to the CLASSPATH successfully then you can begin to make use of them via the object factory pattern. Netbeans will seamlessly use the modules in your application as if all of the code was written in the same language.
Developing Web Apps (Django, etc)
As of the time of this writing, Netbeans has very little support for developing Jython web applications as far as frameworks go. Developing simple servlets and/or applets with Jython are easy enough with just creating a regular web application and setting it up accordingly. However, making full use of a framework such as Django from within Netbeans is not available as of version 6.7. There are many rumors and discussions in the realm of a Django plugin to become part of the Netbeans 7 release, but perhaps that will be covered in a future edition of this book. In the meantime we need to make use of Netbeans in it’s current form, without a plugin specifically targeted for Jython web development. Although there are a few hurdles and none of the frameworks can be made completely functional from within the tool, there are some nice tricks that can be played in order to allow Jython web development worth executing within Netbeans.
In order to deploy a standard web application in Netbeans and make use of Jython servlets and/or applets, simply create a standard web application and then code the Jython in the standard servlet or applet manner. Since there are no plugins to support this work it is all a manual process. Something tells me that making use of the fine code completion and semantec code coloring is a nice perk even if there aren’t any wizards to assist you in coding your web.xml configuration. Since there are not any wizards to help us out, we will only mention that Netbeans makes standard web Jython web development easier by utilizing the features of the IDE, not abstracting away the coding and instead completing wizards.
Using Django in Netbeans
As stated at the beginning of this section, it is not a very straight forward task if you wish to develop Jython web applications utilizing a standard framework from within Netbeans. However, with a little extra configuration and some manual procedures it is easy enough to do. In this section I will demonstrate how we can make use of Netbeans for developing a Django application without using any Netbeans plugins above and beyond the standard Python support. You will see that Jython applicatons can be run, tested, and verified from within the IDE with very little work. Since there are a few steps in this section that may be more difficult to visualize, please use the provided screen shots to follow along if you are not using Netbeans while reading this text.
In order to effectively create and maintain a Django website, you need to have the ability to run commands against manage.py. Unfortunately, there is no built in way to easily do this within the IDE so we have to use the terminal or command line along with the IDE to accomplish things. Once we create the project and set it up within Netbeans then we can work with developing it from within Netbeans and you can also set up the project Run feature to startup the Django server.
Assuming that you already have Django setup and configured along with the Django-Jython project on your machine, the first step in using a Django project from within Netbeans is actually creating the project. If you are working with a Django project that has already been created then you can skip this step, but if not then you will need to go to the terminal or command-line and create the project using django-admin.py. For the purposes of this tutorial, let’s call our Django site NetbeansDjango.
django-admin.py startproject NetbeansDjango
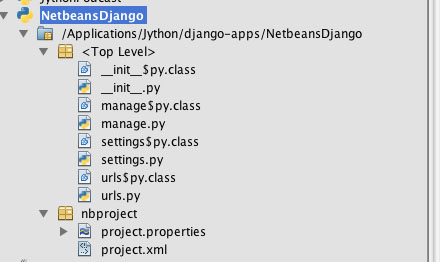
Now we should have the default Django site setup and we’re ready to bring it into Netbeans. To do this, start a new Python project within Netbeans using the Python Project with Existing Sources option, and be sure to set your Python Platform to Jython 2.5.0 so we are using Jython. After hitting the Next button we have the ability to add sources to our project. Hit the Add button and choose the select the main project folder, so in our case select the NetbeansDjango folder. This will add our project root as the source root for our application. In turn, it adds our Django setup files such as manage.py to our project. After doing so your project should look something like the following screenshot.
In this next step, we will configure the Netbeans project Run option so that it starts up the Django web server for us. To do so, right-click (CNTRL+CLICK) on the newly created project and go to Properties. From there choose the Python option in the left-hand menu and add the Django directory (containing the bin, conf, contrib, core, etc. files) to your path. For this tutorial we will also make use of the Postgresql database, so you’ll want to also add the postgresql.jar to your Python path.

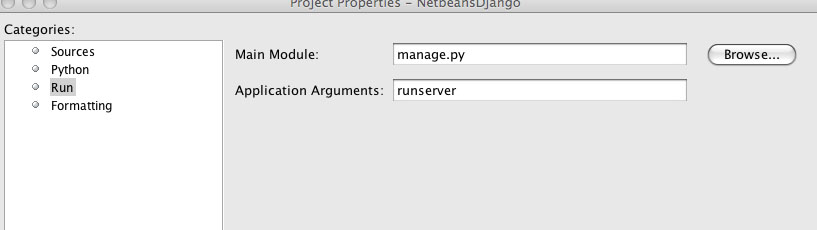
Next, select the Run option from the left-hand menu and add manage.py as the main module, and add runserver as the application argument. This will essentially hook-up the Run project option to the Django manage.py such that it will invoke the Django webserver to start up.
At this point, we are ready to begin developing our Django application. So with a little minor setup and some use of the terminal or command-line we are able to easily use Netbeans for developing Django projects. There are a few minor inconsistencies with this process however, note that there is no real integrated way to turn off the webserver as yet so once it is started we can either leave it running or stop it via your system process manager. Otherwise you can hook up different options to the Netbeans Run project command such as syncdb by simply choosing a different application argument in the project properties. If you use this methodology, then you can simply start and stop the Django web server via the terminal as normal. I have also found that after running the Django web server you will have to manually delete the settings$.py.class file that is generated before you can run the server again or else it will complain.
In future versions of Netbeans, namely the Netbeans 7 release, it is expected that Django functionality will be built into the Python support. We will have to take another look at using Django from within Netbeans at that time. For now, this procedure works and it does a fine job. You can make use of similar procedures to use other web frameworks such as Pylons from within Netbeans.
Conclusion
As with most other programming languages, you have several options to use for an IDE when developing Jython. In this chapter we covered two of the most widely used IDE options for developing Jython applications, Netbeans and Eclipse. Eclipse offers a truely complete IDE solution for developing Jython applications, both stand alone and web based. Along with the inclusion of the Django plugin for Eclipse, the IDE makes it very easy to get started with Jython development and also manage existing projects. PyDev is under constant development and always getting better, adding new features and streamlining existing features.
Netbeans Jython support is in still in early development at the time of this writing. Many of the main features such as code completion and syntax coloring are already in place. It is possible to develop Jython applications including Jython and Java integration as well as web based applications. In the future, Netbeans Jython support will develop to include many more features and they will surely be covered in future releases of this book.
In the next chapter, we will take a look at developing some applications utilizing databases. The zxJDBC API will be covered and you’ll learn how to develop Jython applications utilizing standard database transactions. Object relational mapping is also available for Jython in various forms, we’ll discuss many of those options as well.